Scripting 101
In this education you will learn the basics of creating an algorithm and how to code scripts which helps us by automating our works in Linux systems.
The Structure of Bash Scripting and Introduction to Bash
What is Shell? What is Bash? What scripts do?
In our Bash education series, we will learn to create scripts that helps us with the long command lines by automating them on CLI (command line interface) which we already know from Linux 101 education.
As a beginning, lets give an eye to Bash.
Shortly, shell surrounds the core of Linux, and this shell has many different types. These types are; tcsh, zsh, csh and bash. The communication type between you and the shell, may differ according to the type of the shell. If we use the command echo $SHELL on CLI, the shell will tell us the shell variable, and because there are different shell types. Your shell type is also a variable in Linux.
All right, then who can use these automated works? Answer is simple, everyone. For example, if you are a system administrator, you can write a Bash script which does the changes you have to do on a certain time or on a certain order. A person who finished the Linux 101 education on Open Source Ideas, can check his/her files, file permissions, he/she can keep the packages updated, manage the processes and even can control the server.
To give an example to this:
File and permission check with Bash: Your script can check if your files have been deleted or if they are on the planned concordance or not. You can check the permissions to understand if they are up to date and if they are not, you can make changes on them.
Editor environments for Bash: You can write your Bash scripts with nano, vi, vim, Atom or Microsoft Visual Studio Code. If you are using your Linux computer on a virtual machine and you do not want to install Microsoft Visual Studio Code, you can copy-paste them to your virtual machine after you code them on your actual computer.
Access to The Examples and Docker
During our Scripting 101 education we will learn the subject topics with many examples. There are more than 50 examples for this education and to gain access to these examples we will use Docker technology. The educations on Open Source Ideas are giving container servers to users so users can practice the education easily and this is the Docker technology. (You can reach to the Docker 101 education from here)
Shortly, Docker is creating virtual machines and we will create virtual machines on them. We will create these virtual machines by one or two command line and they will become available for our examples.
docker run -dit --name scripting101 erdates/scripting ; docker exec -it scripting101 bash
After we run these commands we will download an Ubuntu image which is 75 megabytes and named scripting101, and our container server will start running.
Unable to find image 'erdates/scripting:latest' locally
latest: Pulling from erdates/scripting
da7391352a9b: Pull complete
14428a6d4bcd: Pull complete
2c2d948710f2: Pull complete
964f74000710: Extracting [==================================================>]  7.949kB/7.949kB
The output we got is showing us the downloading of the Ubuntu Docker image. After the installation we will join to the container server as root, to join we will use exec command. This output will be like this;
root@44656d7998fa:/#
#We are inside of the container as root.
And now if we send ls command in the virtual machine which we just created,
bin   dev  home  lib32  libx32  mnt  examples*  root  sbin  sys  usr
boot  etc  lib   lib64  media   opt  proc      run   srv   tmp  var
We will be able to see the concordances that we have. If we run cd /examples/ command, we will reach to the concordance of examples. After we reach to the concordance of examples, we can run ls command to see every example on the directory.
We will use a small Ubuntu system, because of this we should update our system to install lacking commands. To update our system, we will use apt update command, you can install commands by typing apt install command.
If you wish, lets check the script environment out. First, lets give an eye to the file nasa.sh. What is this .sh extension? This extension is coming from the last 2 letters of Bash, this is show to us that this file is in Bash format. If we type cat nasa.sh, we will see a fun script which lets us to log-in to system of the NASA.
cat nasa.sh
#!/bin/bash
echo "Getting into NASA"
sleep 1
echo "..."
sleep 1
echo "Got into NASA"
sleep 1
echo "..."
sleep 1
echo "Welcome to NASA"
At the first line we will see #!/bin/bash, this provides the necessary commands for to run the script. As you can remember, bin file is including the Linux commands. Then the commands are starting to run as we explained.
How the scripts work? When we run ls command we will see many files with .sh extension. These files are shown with colour green. If a file has green name, it means we can run it. If a script is not indicated with a green name, then it will not work. As we mentioned in second unit and ninth section of Linux 101 education, we can make the file work with chmod command.
We will use chmod +x script_name.sh command.
We made our file ready for use, so how do we run it? If we indicate our shell name and type our file name, it will start to run, we can use bash script_name.sh or ./script_name. During this course, I will use ./ to run our files, you can use bash script_name.sh too.
If you wish, we can see our nasa.sh file to see what kind of an output it will give to us. When we use cat nasa.sh command to take a look at our script, echo and sleep commands started to work in an order to give us outputs.
Let’s do one more example, we will use our adduser.sh script to create a user and give a password to user. We need to indicate the wanted username after we use the script command.
To choose a username we need to use ./adduser.sh user name. You can type anything you want, just replace it with “username”. If you are having a privacy error, it is probably happening because you are not the user root. In this situation we will use sudo command. When we inspect the file with cat adduser.sh command, we will see echo, sleep, useradd and passwd commands in an order. Instead of typing all of this, we can automate it by adding all of them inside our script with an order. You can check the user which you created by tail -1 /etc/passwd command.
Shell Characters ( ? * [ ] ; ^ ~ )
These characters are helping us by creating functions when we interact with the shell.
Character ? : It provides us letter limitation when we command a query. For example, when we run ls /bin/a?? command, we will only see three letter files, just as /bin/apt & /bin/awk..
Character * : This character is used instead of “All”. If we use ls /bin/a* command we will see every file which starts with “a” and located under bin file. If we switch the position like this; “ls /bin/*a” we will see the files which ends with a and located under bin file.
Character [ ] : This character helps us by giving options. If we use the command like this; ls /bin/[a-c]*, we will see every file which starts with a,b,c.
Character ; : This character is letting us do more than one query. You should not confuse “;” with pipe “ | “. Pipe is letting us to get interacted with commands. When we use uname;date;whoami commands like this, system will reply us with OS, date and user information. If we use pipe like this; uname|date|whoami we will only reach to the OS information, because the commands will not interact with each other.
Character ^ : This character is used with transactions which includes negative queries.
ls -a[^a]* command will provide us every file that does not starts with a letter.
Character ~ : This character’s name is tilde. It is equal to the home directory of Linux user.
cd ~ query will take us to /home/user_name directly. You can reach to other characters from here.
Variables (env, export)
In Linux there are two different kind of variables, one of them is for system and the other one is for user.
We can see the system variables on CLI with env command. When we type env | wc command, we can see all of the 9 variables of the system. The first system variable (HOSTNAME) is used to give a name to the server. Pwd shows us the folder we are in. echo $PWD command shows us the value of pwd. The words which we indicate with $ becomes variable.
How can we change the variables or how can we add new variables?
When we want to add a new variable to our Linux system, first we will send the variable and definition on CLI. Then we will send the variable to system variables with export command.
For example, let’s say there are two computers on the system. When we are doing our transitions on the IP, instead of always typing the IP, we can make them variables and use them in our transition as variables. Let’s look at the example now.
IP addresses on your computer is like this:
first_computer_ip = 192.23.203.45
second_computer_ip = 192.24.204.48
We will type the variables first, then type the values with no space, on CLI.
first_computer_ip=192.23.203.45
second_computer_ip=192.24.204.48
Unless we assign these variables as system variables, these won’t become system variables. If we do not assign them, they will vanish when we reboot our computer.
To see the variables:
If we run env | grep “first_computer_ip” and env | grep “second_computer_ip” commands on CLI, we will see nothing as a result. When we run export first_computer_ip and export second_computer_ip commands with an order, our variables will be defined.
Now if we use the env | grep “first_computer_ip” and env | grep “second_computer_ip” commands on CLI, we will see the system variables as defined. To delete the variables from the system, we need the use unset command.
We will use unset like this ; unset first_computer_ip.
User variables are the variables that we define, for example let’s take a look at the sum.sh script which is in the /examples directory
cd /examples
cat sum.sh
first_variable=10 #There is shouldn't be gap between variable and value. Should be careful about that.
second_variable=20
echo $first_variable
echo $second_variable
echo $((  first_variable+second_variable  )) #There is should be 2 units gap, between parentheses and variables.
sum=first_variable+second_variable
echo $((  sum  )) #There is should be 2 units gap, when we are printing the sum
To call these variables we need to use $(variable symbol) and brackets.
We call the variables with the echo command to write the sum of these two values.
And we add the sum of these two values to the sum variable..
When we type ./sum.sh it will return to us with 10,20,30,30 values.
Customizing the Terminal - using ezprompt.net
We can make changes in the terminal we use, in our laboratory environment, the terminal is given to us as “root@IP adress ~/The directory that we are in” by default and is presented in white as the text colour. If you want, you can remove the user information from the terminal. You can even remove the IP information, you can make it show only the directory that you are in. You can also change the display colours of these informations.
There is a variable in our Linux kernel which tells us how can we use our terminal. If we type echo $PS1 command we will reach to the information. You can change the view of terminal as you like in ezpormt website. As an example, you can change username’s colour, you can hide IP information et cetera. You can even add “:” between username and the directory information.
When we make the changes as we like on ezpromt, the site will give us a code. The code will be something like export PS1="\u:\[\e[32;40m\]\W\[\e[m\]". When we run this command, it will make the same changes on our terminal just like we did on the website. When we run the command, we can see the changes.
Arguments
The arguments header has an important place in bash scripting because we do our queries using arguments. The content of our program named arg.sh in the laboratory is as follows:
echo $0 $1 $2
The purpose of this script is to print the variables 0, 1, and 2 which are given by us on the screen. After typing ./arg.sh to run our script, we give variables 1 and 2 to be sent into the script:
By this, we send “open”,”source”,”ideas” variables to script through CLI. Okay but what kind of an output will we get if we run every script that includes echo command and $0 $1 $2 variables?
./arg.sh open source ideas
The output is ./arg.sh open source, then what happened to “ideas” input? If you have noticed we sent only the 1 and 2 variables, because we added $0, $1 and $2 into the script. This means the script can include only 2 scripts because $0 variable is the command to run the program.
We did not provided a place in script to “ideas”, so because of this it did not show up as output.
If we rearrange our program like echo $0 $1 $2 $3, and if we run ./arg.sh open source ideas, every input we created will become outputs. So let’s look at the types of arguments.
@ Argument : Accepts every input except the programs own name and assigns them automatically to $1,$2,$3…. If we take a look at the arg_@.sh it will be something like ;
echo $@
echo $1
echo $2
echo $3
If we run this script as ./arg_@.sh open source ideas, our output will be as follows.
open source ideas
open
source
ideas
# Argument : It tells us how many arguments the program takes. Let’s take a look at arg_#.sh script.
cat arg_#.sh
echo $@
echo $#
If we run it as ./arg_# open source ideas.
open source ideas
3
We will get this output.
To be an example, we can go through a list of program languages, we will send more than 1 value to the script we will write, and we will put these inputs in a list of variables and print the first index on the screen.
Let’s look into the languages.sh script.
cat languages.sh
languages=("$@") #All given inputs been sent to that variable.
echo ${languages[0]} ${languages[2]}
We will define arguments named ./languages.sh c pyhton java. Our output will be c and java, which are the first and the last ones. If we add echo $* to end of this script, it will print every variable.
Getting Inputs in the Bash Environment
In the example named sum.sh, we have defined our values in the script, but most of the time, we will have to perform operations with the values received from the user in order to interact with the script we wrote.
We will provide this process with the read command, even if we write read directly on the CLI for trial purposes, Linux will wait for us to enter a value, when we enter the value and press enter, there will be no change on the CLI and the entered value will be lost. However, when we include the read command in the script, it will transfer the command we entered through the CLI into the script and it will be able to process in this way.
The first 4 lines of our sum.sh file were as on the left, when we add read command it will be as the right and the output will be easy to understand:
first_variable=10          read first_variable
second_variable=20         read second_variable
echo $first_variable       echo "First value of variable = " $first_variable
echo $second_variable      echo "Second value of variable = " $second_variable
       sum.sh                        sum_read.sh
In the light of this information, let’s examine the structure of the sum_read.sh script.
In the light of this information, let’s examine the structure of the sum_read.sh script.
After running our file as ./sum_read.sh, the read first_value part asked us for the first_value variable and we wrote the value we want, the same is true for the read second_value part.
Then, with the echo command, we specify the value to be printed on the screen and specify the variable with $first_value definition, then we print the second value with echo command.
As we will see after testing this script, the result was not very useful, the action we will do to correct this situation will be to use the -p (promt) parameter of the read command. To check the variables we can add echo command to the end. Let’s examine this example again in the script file named sum_read2.sh.
cat sum_read2.sh
read -p "First value of variable = " first_variable
read -p "Second value of variable = " second_variable
echo ${first_variable}
echo ${second_variable}
We can see that our script is more useful if we organize it as this. When we are retrieving variables, we should not use $, but if we are sending the variable as an output, we have to use $ and {}. If we use -a (array) parameter with read command we can enter more than 1 values, if we use -s (secret) parameter it will prevent the entered value from being displayed on the screen. Let’s take a look at the parameters with read_a.sh and read_s.sh examples.
cat read_a.sh
echo "Write first cluster's values = "
read -a first_cluster
echo "Write second cluster's values = "
read -a second_cluster
echo ${first_cluster[0]},${first_cluster[1]}
echo ${second_cluster[0]},${second_cluster[1]}
With the -a parameter, we get 2 values for each cluster and print the indexes of the entered values on the screen with echo command.
Indexing; It is to show the places of values in defined data sets. For example, if the first product to be bought in a shopping list is apple and the second is pear, the first index of this list is apple. In indexing processes, values start from 0, the first value is equal to the 0th index.
cat read_sp.sh
read -p "Username : " username
read -sp "Password : " password #s and p parameters should be used together.
The -s parameter ensures that the entered variable is not visible on the screen, so we can enter variables that require privacy. The -s parameter must be used together with the -p (promt) parameter.
Condition Expressions
Condition statements are expressions that control the variables used and will be used by the script. It also can control system variables, the states and values of the units such as directory & file & folder, and it can indicate how the algorithm in the script will progress. Condition expressions that satisfy queries are if, elif, else.
if= It is the first step of the condition situations, takes place at the very beginning and is used once. We need to end it with fi.
elif= Compares the 2. 3. 4.… states of the condition.
else= It is used in situations that do not meet any conditions.
The working principles of if expression is taking place in the script named if.sh. We will write a command into the script example and if there is already such a command, the echo command will tell us “There is such a command already!” If the command does not exist, the output will be; “There is no such command!”
cat if.sh
if date #check for "is date command exist?" and runs it
then #if that check is "ok", runs commands below.
    echo "There is a command like date!"
else #when if state wont be used, that line will be used
    echo "There is no command!"
fi
Now let’s try a different command, we will take a different value and we will check if it’s a command or not, we will display the result with echo command.
cat if2.sh
if $1 #checks the command and runs it
then #if that check is "ok", runs commands below.
    echo "There is a command like {$1}!"
else #checks the "if" block, and runs commands below, if line after "then" did not work.
    echo "There is no command like {$1}!"
fi
When we send ./if2.sh pwd, we will get “There is such a command already!” answer, if we type ./if2.sh pvd we will get “There is no such command!” answer.
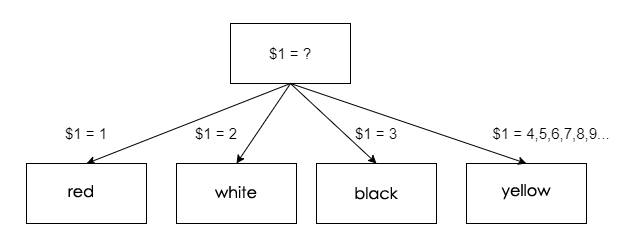
Let’s see the use of elif with another example. Let’s say we send a value to the script over the CLI, and if this value is equal to 1, it will print red, if it is equal to 2 it will print white, and if it is equal to 3, it will print black. If the entered value is not equal to one of the numbers 1, 2, 3, it should print yellow. If we match this situation with the condition expressions we mentioned above.
It will be like this;
if $1 = 1 > red
elif $1 = 2 > white
elif $1 = 3 > black
else > yellow
If we visualize our algorithm, it will look like this;
Now let’s take a look at how the condition states are written in the script.
cat conditions.sh
#! /bin/bash

if [[  $1 = 1  ]]    #Checks for value is equals to 1 or no
then   #If first query if okay, that line be activated and commands below will be running.
echo "Value equals to 1. Result is red" #If first "if" block works, that line will be working.
elif [[  $1 = 2  ]]
then
echo "Value equals to 2. Result is blue" #If second "elif" block works, that line will be working.
elif [[  $1 = 3  ]]
then
echo "Value equals to 3. Result is black" #If third "elif" block works, that line will be working.
else  #There is no such a query line, we are not using "then" after that.
echo "Value is not around [1,3], result is yellow"
fi    #We are ending if block.
Comparison Operators
Comparison operators are used to compare variables with each other. We can provide the flow of the written algorithms and commands through these operators. The comparison operators are as follows:
-eq (equal) ; == ; It checks for the condition that the variables are equal to each other.
-ne (not equeal) ; != ; It checks for the condition that the variables are not equal to each other.
-lt (less than) ; < ; It checks whether one variable is less than another variable.
-gt (greater than) ; > ; It checks whether one variable is greater than another variable.
-le (less or eqaul) ; <= ; Checks whether one variable is less than or equal to another variable.
-ge (greater or eqaul) ; >= ; Checks whether one variable is greater than or equal to another variable.
Let’s take a look at the comparison_opt.sh script as an example.
In this script, 2 numbers are given as variables and the script will check the variables with 3 different ifs.
There will be 2 queries in the first if header, “Are the values equal or not?”
There will be 3 queries in the second if header “Is the first value large? is it small? equal? “
There will be 3 queries in the third if header “is it greater than or equal? is it less or equal? are the values valid? “
When repeating the examples, do not forget how then and fi commands are used.
cat comparison_opt.sh
#! /bin/bash
if [[  $1 -eq $2  ]] #can be -eq rather then ==
then
echo "First and second numbers are equal"
elif [[  $1 -ne $2  ]] #can be -ne rather then !=
then
echo "First and second numbers are not equal"
fi #We are closing the first query
##
if [[  $1 -lt $2  ]]
then
echo "First value is less than second value."
elif [[  $1 -gt $2  ]]
then
echo "First value is greater than second value"
else
echo "First and second numbers are equal"
fi #We are closing the second query
##
if [[  $1 -ge $2  ]]
then
echo "First value is greater or equals to second value."
elif [[  $1 -le $2  ]]
then
echo "First value is less or equals to second value"
else
echo "Please, type valid values..."
fi #We are closing the third query
And & Or Operators
In True / False operations, 1 means true and 0 means false. If a condition parameter is true, it returns 1 to the system, and it returns 0 if it is false. So how do we ensure that there are more than 1 condition parameter in the condition situation we have prepared? We provide this with the and & or operators.
Let’s consider the and operator with an age query model with and.sh as an example. And operator is used by typing “&&” or -a. Both of the queries which are given for the and operator, needs to get true(1) output.
cat and.sh
#! /bin/bash
if [[  $1 -gt 0 && $1 -lt 18  ]]
then
echo "Age is not higher than 18!"
else
echo "Age is higher than 18 or equls to 18"
fi
Our script here asks whether the value of $1 is greater than 0, and in the second part it asks whether it is less than 18. Both inquiries are answered with “Age is not higher than 18!”.
For example, let’s consider the or operator with a simple game model with or.sh. The or operator is used by typing two pipes “||” or -o. For the Or operator, it is sufficient if 1 of the queries entered gets the true(1) value. In the or.sh script, when the value of x we enter is less than 5 or greater than 13, we win the game. When it doesn’t meet these conditions, we lose.
cat or.sh
read -p "Type a value = " x

if [[ ( $x -lt 5 || $x -gt 13 ) ]]
then
echo "You won the game!"
else
echo "You couldn't win the game!"
fi
File Validation Operators
With the scripts we write, we can check the status of our files, access permissions, whether they are writeable or not, and we can automate them. Starting from this section, after using if, we will write the then line on the same line as if. We will use it like; if [[ $1 -eq 5 ]]; then. The sign “;” will allow us to write the parameters on the same line, and in this way our scripts will be more understandable.
The script we wrote in the first example will check whether there is a file with the name we entered as a variable. If there is no file with the entered name, it will create a file with the given name.
First, let’s enter the name of the file that we will check. Then let our if block to check the file. Then it should indicate with echo whether a file with the entered name exists or not.
Let’s analyze the content of our file_check_e.sh script
cat file_check_e.sh
read -p "Type a file name = " file

if [  -e $file  ]; then
echo "There is file has $file name"
else
echo "There is no file has $file name."
sleep 0.5
echo "$file is being created..."
mkdir $file
sleep 0.5
echo "$file just created."
fi
The -e parameter in the if block is the parameter that checks whether the file exists or not, the other parameters checks as follows.
-e = Checks if the file exists ; exist
-d = Checks if the file is a directory ; directory
-s = Checks if the file is full; size
-r -w -x = With an order, it checks whether the file is readable-writeable-executable.; read-write -execute
-f = It checks if the file is available and checks if it is regular. (regular file = the file can do -r -w -x)
These are the operators used frequently, there are other operators as well. You can take a look at the file_control.sh script for using different parameters.
Adding Text in a File
With a script that we write, we can specify a file name, enter the file and add articles. In order to do this, the file must first be regular. (have the -r-w-x privileges). The script we will write will have an algorithm as in the image.
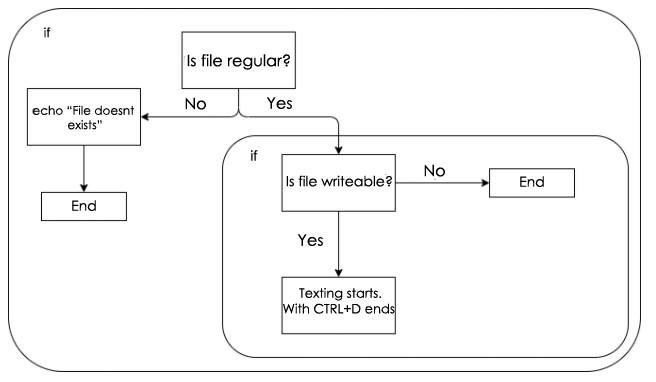
First of all, we get the file name from the user and query whether the file is a regular file or not. Then we create another query with the answer from this query. This causes an if block to appear below an if block. You can see this situation in the image.
If our file is not writeable, the script will exit before completing its task. If the file is writeable, we can enter the file and make changes as we want. If there are previous texts in the file, what we wrote will be placed under that text. So how do we exit the writing process? We do this with Ctrl + D shortcut, if we do it with Ctrl + C, the last line we wrote can be deleted.
Here we give an example of how we can write condition inside condition.
The contents of the adding_text_to_file.sh file are as follows.
cat adding_text_to_file.sh
#! /bin/bash

read -p "Type file name = " file

if [ -f $file ]; then
if [ -w $file ]; then
echo "This file is a writable file. Press CTRL+D for exit."
cat >> $file
else
echo "This file is a non-writable file."
fi
else
echo "File is not exist"
fi
The script will work when we write it as above, but the queries will be difficult to distinguish. If we use indentation while writing scripts, it will be much easier to fix when there is a problem in the script we wrote or it will be easier when it needs to be updated. Here we have made a more readable script named adding_text_to_file2.sh, by leaving a unit of space. When we analyse the new file:
cat adding_text_to_file2.sh
#! /bin/bash

read -p "Type a file name = " file

if [ -f $file ]; then
 if [ -w $file ]; then
 echo "This file is a writable file. Press CTRL+D for exit."
 cat >> $file
 else
 echo "This file is a non-writable file."
 fi
else
echo "File is not exist"
fi
Case Usage
The case statement is an expression used to indicate the actions the variable will take if it takes different values. For example, if the value x is variable A, then it outputs B, and if its C the output will be D. Let’s go through examples to understand the use of case faster.
You can access to the examples through the case.sh and case2.sh files.
cat case.sh
#! /bin/bash

read -p "Choose a number, that will give you a city (01,02,03,04) = " number

case $number in
	"01" ) #That part will be working when number is 01
	echo "$number equals to Lublin";;
	"02" ) #That part will be working when number is 02
	echo "$number equals to Warsaw";;
	"03" ) #That part will be working when number is 03
	echo "$number equals to Krakow";;
	"04" ) #That part will be working when number is 04
	echo "$number equals to Poznan";;
	* )
	echo "Please enter number around 01-02-03-04"
esac #Shows us case is ended
cat case2.sh
#! /bin/bash
marmara=10;aegean=03;mediterranean=01;central_anatolia=06;black_sea=05;eastern_anatolia=04;southeastern_anatolia=02

read -p "Enter a number, that will give you a part from Turkey [01-02-03-04-05-06-10] = " number

case $number in
        $marmara)
                echo "$number belongs to Marmara region";;
        $aegean)
        	echo "$number belongs to Aegean region";;
        $mediterranean)
        	echo "$number belongs to Mediterranean region";;
        $central_anatolia)
        	echo "$number belongs to Central Anatolia region";;
        $black_sea)
        	echo "$number belongs to Black Sea region";;
        $eastern_anatolia)
                echo "$number belongs to Eastern Anatolia region";;
        $southeastern_anatolia)
                echo "$number belongs to Southeastern Anatolia region";;
        *) #That part is for invalid numbers, like not in [01-10] or not integer
        	echo "Please give a valid number... [01-10] ";;
esac
Array Uses
Arrays are structures from multiple data bars. A structure containing the names of all fruits is also an array, your shopping list is also an array, a structure that automatically and regularly contains the IP information of users who log into your system is also an array.
We introduce the arrays as follows; array_name = (‘value1’ ‘value2’ ‘value3’ ...)
We should define our data according to the type of data we will use. As seen in the example, we can define our data as “value” without using the “ sign, but if your data contains more than one word, we must specify it as “value” or ‘value’.
cat array.sh
#!/bin/bash

shopping_list=("bread" 'water' cookie)
toDo_list=('clean the room' 'edit the files' 'look at the notes')
echo "-- Shopping List --"
echo "Whole list and length of list"
echo ${shopping_list[@]} "||" ${#shopping_list[@]}
echo "First item = " ${shopping_list[0]}
echo "Second item = " ${shopping_list[1]}
echo "Third item = " ${shopping_list[2]}
echo "-- To Do List --"
echo "Whole list and length of list"
echo ${toDo_list[@]} "||" ${#toDo_list[@]}
echo "First item = " ${toDo_list[0]}
echo "Second item = " ${toDo_list[1]}
echo "Third item = " ${toDo_list[2]}
As an example, let’s write a shopping list and to-do list. The script we have written will tell us what these lists are, their lengths, and what they contain, one by one.
Because each of the data on our shopping list is a single word, we were able to freely identify them. However, since each data on the to-do list are two words, they are stated as ‘value’.
Second, we can look at the array2.sh example. In this example, we add 4 IP addresses to the script and define these addresses in an array, then we pull the values from the indexes of the directory and write them on the screen.
cat array2.sh
#!/bin/bash

read -p "Please add IP of first user = " user1_IP
read -p "Please add IP of second user = " user2_IP
read -p "Please add IP of third user = " user3_IP
read -p "Please add IP of fourth user = " user4_IP
ip_adresses=(${user1_IP} ${user2_IP} ${user3_IP} ${user4_IP})
echo "IP List"
echo "-- -- -- -- -- -- --"
echo "Users:"
echo ${ip_adresses[0]}
echo "---"
echo ${ip_adresses[1]}
echo "---"
echo ${ip_adresses[2]}
echo "---"
echo ${ip_adresses[3]}
Loops
While
Loops constantly controls a process-situation. This control continues until this process is accessed. The while command is a routine that repeats until the checked state is correct.
Let’s try to understand the loops part with an arithmetic example.
cat while.sh
#! /bin/bash

x=0

while [  $x -le 15  ] #Condition defined to loop here, untill x gets 15 value that condition will be active
do #Set the things to do after that part
    echo "X value = $x"
    x=$((x+1))
    sleep 0.5 #Wait 0.5 second after every step
done #Part for ending the "do" task
For
The for command is a command that allows operations to be performed as many times as defined. For example, it allows us to do repetitive operations such as “repeat commands as many times as entered”.
In the for.sh example, the x value first goes to the value 1 and runs the echo command, then it goes to the value 2, and it performs the operations up to the last value defined. Thus, we print the type of shell we use from 1 to 4 in the for.sh example.
cat for.sh
#! /bin/bash

for x in 1 2 3 4 #that can be {1..4..1} also.
do #Set the things to do after that part
  echo $SHELL
done #Part for ending the "do" task
In the for2.sh example, we will assign 0 to the value of x and run the same command again and again until it is completed to 4 by arithmetic operation (using the above usage in a different way).
cat for2.sh
#! /bin/bash

for ((  x=0;x<=4;x=x+1  ))
do #That -do- part, where we start the processes
  echo $SHELL | cut -c 6-9 #We combine 2 commands with pipe '|' here.
done # The line where we end the process
Now, in the for3.sh example, let’s use the for loop by interacting with the folder we are in. In this example, all (directory, file…) structures that exist in the directory we are in are listed.
cat for3.sh
#! /bin/bash

for file in * #For showing all file's inside on the current directory
do
  if [ -e $file ] #Query of "Is file exist?"
  then #If its exist, runs the commands below
    echo $file
  fi
done
The algorithm of the query is as in the image.

Finally, let’s write a script with for loop that will display the files in the directory we are in.
cat file_viewing.sh
echo "Press y for view the file, press n for view another file"
for file in $(ls *.sh)
do
    echo -n "Do you want to see the $file? (y or n) = "
    read answer
if [ $answer == 'y' ]
then
cat $file
fi
done
Select
Select program allows our variables to perform operations based on the value contained in a list. This definition is similar to the case command.
cat select.sh
#!/bin/bash

echo "Choose a product..."
select product in Tshirt Sneakers Watch #We are writing variable list for choosing
do
    echo "$product added to shopping cart."
done
Now let’s write a script where we will use select and case programs together.
cat select2.sh
#!/bin/bash

echo "Choose a product..."

select product in Tshirt Sneakers Watch #We are writing variable list for choosing
do
    echo "$product added to shopping cart."
    sleep 1
    case $product in
    Tshirt )
        echo "Blue $product just selected";;
    Sneakers )
        echo "Adidas $product just selected";;
    Watch )
        echo "Leather strap $product just selected";;
    * )
        echo "Please write valid product type ...";;
    esac
done
With these changes, the script has become more interactive. To exit this type of loop, we must use the exit command.
In the select3.sh example, we see a script that runs continuously until you enter a valid value.
cat select3.sh
#!/bin/bash

echo "Choose a product..."

select product in Tshirt Sneakers Watch #We are writing variable list for choosing.
do
    echo "$product added to shopping cart."
    sleep 1
    case $product in
    Tshirt )
        echo "Blue $product just selected"; exit;; #For executing "exit" command, after "... just selected" part we should add ";" at the end.
    Sneakers )
        echo "Adidas $product just selected"; exit;;
    Watch )
        echo "Leather strap $product just selected"; break;; #We may use break command also for finishing the loop.
    * )
        echo "Please write a valid product type";;
    esac
done
Break and Continue
As we can see in the select3.sh example, we can stop our operations and loops with the exit and break commands, but the exit command actually closes the terminal, it does not close the loop we made. For example, you are using Google Chrome and you turn your computer off and on to close the Chrome browser. The break command just stops the loop then does not interact with the terminal.
Now let’s examine the break command we will use for these operations.
cat break.sh
#!/bin/bash

for x in {1..10..1} #that part can be (seq 2 2 100) also
do
    if [ $x -eq 3 -o $x -eq 5 ]
    then
        break #script will be stopped when x equals to 3 or 5
    fi
    pwd
    sleep 0.5
done
Unlike the break command, the continue command allows the program to pause rather than stop it. If we use continue instead of break in the example above, it makes the program stop at 3 or 5 instead of stopping when x is 3 or 5, so when x is 3 and 5, that block will not work. Let’s look at the continue command with the same example.
cat continue.sh
#!/bin/bash

for x in {1..10..1}
do
    if [ $x -eq 3 -o $x -eq 5 ]
    then
        continue #Script passed the process when x equals to 3 or 5.
    fi
    pwd ; echo {$x}
    sleep 0.5
done
Functions
If we look at the definition of the function in mathematics, it is the rules that accept the variable numbers as input and create an output from them. It is a type of transaction. So in the bash environment the functions that we defined will allow us to do operations on the values we have entered. You can do a mathematical operation that you do continuously by calling a function in the script. If arithmetic operations such as addition, subtraction, date formatting are repeated frequently in the script, it would be very logical to do them with a function.
As the first example, let’s define the function “taking twice the value entered and adding ten”.
cat function1.sh
#! /bin/bash
read -p "Type a value = " x #Taking the value from user
function math_func(){ #We are typing the function title and opening {} block for writing commands inside.

    let y=2*x+10 #Having new variable from value and variable.
    echo "$y" #Printing the result.

}

math_func #We are calling the function here.
In the second example, let’s consider the functions that come into contact with our computer.
cat function2.sh
#! /bin/bash

function date_and_calendar(){
    date
    cal
}

function directories_and_user(){
    ls /
    whoami
}


date_and_calendar
directories_and_user
Useful Linux Commands & Tools
Finally, we will discuss the Linux commands that will be useful for scripting.
alias - Giving Aliases to Commands
For example, let’s assume that as an employee in a company, you have to check a file at least 4-5 times a day. To check this file, we have to exit the directory you are in and enter the directory where the file is located. Then we strive to print the content you want to view in the format you want. There’s a much easier way to do this, especially when you want to do this multiple times.
For example, you want to check the initial values of the passwd file of the /etc directory.
Instead of always entering this command, let’s divide this command into two and call it easily with aliases. (We will see the awk command with more detail later.)
The alias assignment format is as follows: alias alias_name = ‘the script directory you want to assign’. We said that we will divide our sample script into two parts, the first part will display the file and the second part will filter the output and get the output we want.
alias showpasswd='cat /etc/passwd'
alias awkfilter='awk -F ":" "{print \$1}"'
showpasswd | awkfilter
We’ve made our long scripts easier and more useful. You can remove the defined alias values with the unalias alias_name command.
awk
The awk command is one of the most used text manipulation tools, actually awk is a programming language. Awk allows us to output the partitioned files such as “. , : ; |” as we want.
I guess you already remember the text editing commands such as cat, head, tail from Linux 101 education. Awk helps us by filtering the outputs which we got from these commands and lets us to create a better output for our desires. The usage of awk is as follows:
awk ‘{print $desired_value}’ awk.txt. If we want the first values of every line of awk.txt we need to type awk ‘{print $1}’ awk.txt, and the output will be just like this::
1
4
7
If we write 2 instead of 1, this time it will bring up the second column, but it will be easier to do such operations with the cut command, so we can start using awk in a way that works better for us. With the cat students.txt command, we will see the information of 20 randomly generated students. Let’s pull the value we want from this file with the awk command.
cat students.txt | awk '{print $1}'
If we use the command above, the whole list of data will come back to us. As you can see, the data are separated from each other with a “,” sign. If we do not shred the data, all the data will be like a pattern and will be unusable.
To say “give me these files been seperated by commas and show the second value as name of all students” to awk is by separating the file by using -F (file seperator) parameter.
cat students.txt | awk -F ',' '{print $2}'
When we send this command line, it will bring 20 student names. If we change 2 with 6, we will see the IP addresses of students. You can obtain random data and write your own examples on the website named Mockaroo.
cat students.txt | awk -F ',' '{print $2, $3, $4, $5, $6}'
If it is like this, you can pull every data without using sequence numbers.
cat students.txt | awk -F ',' '{print "Student:" $2, $3,"| mail:" $4,"| IP:" $6}'
If the format is like this, we can obtain the information by listing.
cut
Cut is very similar with awk, but in cut it is easier to make changes about texts. As the name suggests, cut allows us to trim data from files.
cut -d ',' -f2,3 students.txt
When we enter in this way, it will give us values in the form of “name, surname” from our student set.
sed
The sed command stands for stream editor, this command changes the flow of the values we receive, so we can change the value we want with the value we want. If you want, you can use the sed command in our students.txt file. Let’s change the Female, Male information to FEMALE, MALE. Then, let’s transfer the changed version to the students_tr.txt file so by this we won’t damage our first file.
sed 's/Female/FEMALE/' students.txt >> students_tr.txt
After defining it in this way, we obtain the students_tr file, now let’s edit the data of the male students in the students_tr and complete the example.
sed 's/Male/MALE/' students_tr.txt
In this moment, I want to talk about something. After I completed this education, I checked the sample files with the nano command in the laboratory environment and Turkish characters were causing problems in the laboratory environment. With the sed command, I was able to change all Turkish lowercase and uppercase letters in more than 50 files in seconds as follows.
sed -i 's/Wrong character/Correct character/g' *
grep
We processed the grep command in the Linux 101 tutorial, but let’s go over it again to remind you, because we will also use the grep command in the following commands.
Grep shows us whether the entered value is in the searched file or not. For example, let’s keep student mails which has the “.com” extension in a separate file.
grep '.com' students.txt > students_com.txt
We can do it by this.
If we use grep command with -c (count) parameter, it will tell us the number of our query.
grep -c '.com' students.txt
Now let’s separate the students.txt file from the commas using the other commands and take students whose IP addresses start with 14.
cat students.txt | awk -F ',' '{print $6}' | grep '14?*'
Let’s look at the file named history_check.sh as another example. If we look at this script;
cat history_check.sh
date >> history_check.txt ; cat history.txt | grep 'sudo' | nl >> history_check.txt
date >> history_check.txt ; cat history.txt | grep 'root' | nl >> history_check.txt
Let’s look at the file named history_check.sh as another example. If we look at this script
When we run this example, it types the day and time of the operation into history_check.txt.
Then history command makes a search by using grep filtering, in our example the search is happening in history.txt. By this filtering we are learning if important codes such as sudo and root has been used or not.
wc
The wc command, on the other hand, shows us the number of lines in a file, the number of words and how much the byte value is, and does this in an order.
cat students.txt | grep 'Female' | wc
When we send the query above, it will give 12 12 715 as respond. These values are telling us that there are 12 lines, 12 words and 715 bytes in total in our file. The -l parameter shows how many times it has been used. Thus, we learned that there are 12 lines containing the expression “Female” in the students.txt file. As another example, we can look at student_num.sh.
This example will alert us in cases where the number of students is less than 20. During the example, we will use the cut and wc commands together, and we will touch on another issue that I believe is important in this script. “Assigning script output to variable”..
cat students_count.sh
number=`cat students.txt | wc | cut -d" " -f6`
#After "number" variable, with ` ` we sent integer output of command lines to number variable
#Output after commands is 19, so that "number" is equals to 19
if [ $number -le 20 ]; then
echo "There is not enough student."
else
echo "There is enough student."
fi
tr
The tr command is a command that allows us to control the data which contained in the file contents, just like the sed command. Usage: cat file | tr '[a-z]' '[A-Z]'. After this script, all values printed on the screen will be printed in capital letters.
If we go through our students.txt file,
cat students.txt | tr '[a-z]' '[A-Z]'
or
cat students.txt | tr '[:lower:]' '[:upper:]'
We can use it like that too.
As another example, let’s assign space values instead of commas in students.txt file.
tr ',' ' ' < students.txt
sort
The sort command is a command that sorts numeric values in ascending order and words alphabetically. If we want to print out our students.txt file in alphabetical order according to the names of the students
cat students.txt | awk -F ',' '{print $2,$3,$4,$5}' | sort
We could do it like that. Let’s look at another example through our orders.txt file.
cat orders.txt
When we type like that, we will see a 20-line text file divided into 5 units in the form of customer, country, currency, mail, amount. First, let’s get an output as amount currency customer with awk and sort it from less to more with the sort command.
cat orders.txt | awk -F ',' '{print $6, $3, $1}' | sort
uniq
uniq command comes from the word unique. Our uniq command allows us to extract duplicate lines in files. Let’s divide this text into parts with the commands we have learned now and learn their numbers with uniq. If we look at the prices in our orders.txt file, there are 20 amounts, but they are not all different amounts.
cat orders.txt | awk -F ',' '{print $6}' | sort | uniq
When we send this query, every cost of the orders will come to us with an ascending order. We will need to send the -c (count) parameter to the uniq command to find out how many times the amounts in this query have been passed.
cat orders.txt | awk -F ',' '{print $6}' | sort | uniq -c
When we send the query above, we will see how many times each amount is repeated.
nl
The nl abbreviation is standing for number of lines command. It writes which line they are in to the beginning of the lines of our printouts. It is a command used in list operations.
cat orders.txt | nl
If we use it like this, we will get a printout with numbers added to the beginning of lines.
cat orders.txt | nl > orders_nl.txt
Just like this we can create a file with numbers added.
curl
Curl tool allows us to obtain a web page with HTTP protocol. After curl is installed on our virtual machine, we can go to the examples.
apt update ; apt install curl -y
So what can we use the curl tool for? We can check whether our website is working properly or not by pulling it with curl. If we write a script that includes curl, we will pull the HTML file of our website at regular intervals, and for 1 hour, curl will notify us when it encounters an error.
cat curl.sh
for y in {1..60..1}
do
curl -s www.github.com
if [  $? == 0  ];then
echo "github.com is reachable!"
else
echo "github.com is not reachable!"
fi
sleep 10
done
Short Quiz
After you selected your answers, press to Gönder for sending answers. You can see the results as true and false.
What is the shell character that means “Every” or “All”?
- ( ) @
- (x) *
- ( ) #
- ( ) ?
How to remove a system variable that is active on the shell?
- ( ) alias
- ( ) env
- ( ) export
- (x) unset
What is the argument number 0 (zero) for a script?
- ( ) shell type
- (x) scripts own name
- ( ) first argument given
- ( ) user name
What is the command that provides input from the keyboard into the script?
- ( ) alias
- (x) read
- ( ) cat
- ( ) echo
What command is used to end an if query?
- (x) fi
- ( ) elif
- ( ) if
- ( ) then
Let’s say we have a list of arguments, what is the value of programs = ‘python,C,java,go’ programlar[2] ?
- ( ) python
- ( ) c
- ( ) go
- (x) java
Which read command parameter prevents written values from being displayed on the screen?
- ( ) -p
- ( ) -d
- (x) -s
- ( ) -h
Which of the following file operator parameters are defined incorrectly?
- ( ) -e “Queries whether the file exists or not”
- (x) -f “Queries file size”
- ( ) -d “Queries whether file is a directory or not”
- ( ) -x “Queries whether the file is working or n”

