4. System Administration and Basic Network Configuration
Within this section, we will learn about fundamental system administration tools, user management, and basic network configuration in Linux.
Topics covered in this section:
Usage Tips
Throughout the training, command-line examples are presented in three different ways:
- Commands displayed in inline backticks, such as `example`, are mostly used to introduce or define commands that need to be typed.
- Code blocks shown inside boxes (like the one below) can be clicked in some interactive environments to run them directly in the terminal without manual copy-paste:
```term1
uname -a
Code snippets displayed in a window (similar to the one below) represent the commands you need to type yourself. In most cases, you will have to supply a unique ID or another variable. The < > symbols denote the part that you must modify according to your context:
arduino
Copy code
hostnamectl set
- Managing Users and Groups Linux is a multi-user operating system that manages user accounts, which can be organized into various groups and assigned different permissions. Managing user accounts is one of the most fundamental duties of a system administrator. To do this effectively, you need to understand a few key concepts, as well as the tools and configuration files used to control users and groups. Essentially, Linux stores and references all these accounts in a relational-like database, which it then enforces via file system permissions.
How Do Users and Groups Work? Today, almost everyone is familiar with the idea of a bank account or a username/password combination. Similarly, Linux has user accounts—just as in Windows, macOS, or other operating systems. Within Linux, these accounts contain a username, password, associated groups, home directory, and default shell, among other information.
In addition to human users, Linux systems have special accounts for various system services. For instance, the cups account is used to handle printer operations on your server. These “non-human” accounts run behind the scenes, providing services for hardware and processes, such as printing.
As Linux is a true multi-user operating system—allowing multiple users from multiple computers or terminals to access a single system—knowing how to manage user accounts is crucial. You will need to be familiar with adding, modifying, locking, and deleting accounts, as well as controlling the permissions that users need to fulfill their assigned tasks.
Adding a User Account To add a new user, run one of the following commands as root:
css Copy code adduser [new_account] useradd [new_account] (For instance, you can create a user named “senol”.)
term1 Copy code adduser senol When a new user is created, the following happens:
A home directory is created (by default, /home/username).
The following hidden files are copied into the user’s home directory, providing environment variables for their session:
none
Copy code
.bash_logout
.bash_profile
.bashrc
A mail folder is created for the user at /var/spool/mail/username.
A new group is created with the same name as the user.
Different parameters can also be passed to useradd for more specific requirements. For example:
term1 Copy code useradd -m -d /var/www/html -k /etc/other.skel -s /bin/zsh -c “AcikKaynakFikirler Web” -u 1999 akf-web Parameters Explained:
-m: Creates a home directory. -d: Sets the home directory path (in this example /var/www/html). -k: Specifies a skeleton directory (a template directory). -c: Adds a comment (often used to describe the user or their role). -u: Manually sets the user ID (otherwise, the system assigns the first available above 1000). -s: Defines the default shell (e.g., /bin/zsh). The /etc/passwd File in User Management All user account information is stored in /etc/passwd. Each account has one line in this file. Passwords are stored in a separate file called /etc/shadow, which is restricted to root only (permissions 600)—manually editing it is generally not recommended.
The /etc/passwd file is composed of these fields, separated by colons:
none Copy code [username]:[x]:[UID]:[GID]:[Comment]:[Home_Directory]:[Shell] Field Explanations:
[username] is the account name. The second field [x] indicates that the password is stored in /etc/shadow. [UID] is the numeric user ID. [GID] is the numeric primary group ID (the group the user belongs to by default). [Comment] typically stores the user’s full name or account description. [Home_Directory] is the user’s home directory. [Shell] is the user’s default shell when logging in. You can see the current content of /etc/passwd with:
term1 Copy code cat /etc/passwd The /etc/group File in Group Management Group information is kept in /etc/group. Each line has this structure:
none Copy code [Group_Name]:[Group_Password]:[GID]:[Group_Members] Field Explanations:
[Group_Name] is the group’s name. [Group_Password] is typically x, indicating that /etc/gshadow is used instead. [GID] is the numeric group ID, corresponding to what you might see in /etc/passwd. [Group_Members] is a comma-separated list of users in that group. term1 Copy code cat /etc/group When a user is added, a group with the same name is automatically created and added here.
Modifying a User with usermod After creating an account, you can modify it using usermod. The basic usage is:
css Copy code usermod [options] [username] Examples:
Setting an Expiration Date Use –expiredate with a YYYY-MM-DD format:
term1 Copy code usermod –expiredate 2021-1-1 senol Adding the User to Additional Groups Use the -aG or –append –groups options to specify a list of groups:
term1 Copy code usermod –append –groups root,users senol Changing the Home Directory Use -d or –home with the new absolute path:
term1 Copy code mkdir /a chown senol:senol -R /a usermod –home /a senol Changing the Default Shell Use –shell with the desired shell path:
term1 Copy code usermod –shell /bin/sh senol You can list a user’s groups with:
term1 Copy code groups senol id senol A single command can combine multiple parameters:
term1 Copy code usermod –expiredate 2021-01-01 –append –groups root,users –home /a –shell /bin/sh senol Locking and Unlocking a User You might need to temporarily disable a user’s access:
Lock a user: term1 Copy code usermod –lock senol Unlock a user: term1 Copy code usermod –unlock senol Deleting User Accounts By default, userdel removes only the user from the system, leaving the user’s home directory intact. Use the –remove option to delete everything (home directory, mail spool, etc.):
css Copy code userdel –remove [username] For example, to remove the user we created:
term1 Copy code userdel –remove senol Adding or Deleting a Group Add a new group: css Copy code groupadd [group_name] Delete an existing group: css Copy code groupdel [group_name] Files owned by that group will not be deleted, but the group ownership will be replaced by its GID.
- vim — A Powerful Text Editor (and Some Notes on nano) Before talking about vim, it’s worth mentioning nano (once called pico), a simple and user-friendly text editor. Nano displays its keyboard shortcuts at the bottom of the screen; however, its functionality is fairly limited compared to vim. While nano is perfectly fine for quick edits—especially on systems where you cannot install anything else—it’s recommended to learn vim if you do a lot of work in Linux. Vim might have a steeper learning curve, but once you get used to it, it can greatly speed up your workflow.
Installing nano on a Debian-based system:
term1 Copy code apt-get update && apt install nano -y Open a file with nano:
term1 Copy code nano /tmp/ilknanotest.txt You’ll see shortcuts at the bottom, helping with simple operations such as saving, exiting, etc.
About vim (Vi Improved) vi was one of the first screen-oriented text editors for Unix, designed to be simple yet powerful. vim (Vi Improved) extends vi, offering more features, such as syntax highlighting, mouse support, graphical versions, “visual mode,” advanced editing commands, and extensive file type recognition.
While learning vim can be more challenging than nano or Emacs, it’s an essential skill in the Linux world. If you’re using a Debian-based system, it might come with vim-tiny or vim-light. Installing the full version is highly recommended:
term1 Copy code apt update && apt install -y vim Creating and Editing a File with vim
term1 Copy code vim /tmp/firstvimfile.txt or
term1 Copy code vi /tmp/firstvimfile.txt When vim opens an empty file, it starts in “view” mode (also known as normal mode). To start typing, press i to enter insert mode (–INSERT– appears at the bottom). When you’re done typing, press the ESC key to leave insert mode and return to normal mode. To save your changes and exit, type : to enter command mode, then:
:wq (write + quit) or use :w (write), followed by :q (quit) Check your new file:
term1 Copy code ls -la /tmp/ Vim supports many additional features, such as searching with /, or other edit modes like a (append) and R (replace). Refer to a vim “cheatsheet” for a quick overview of these commands. Two sample vim cheatsheets are provided below:
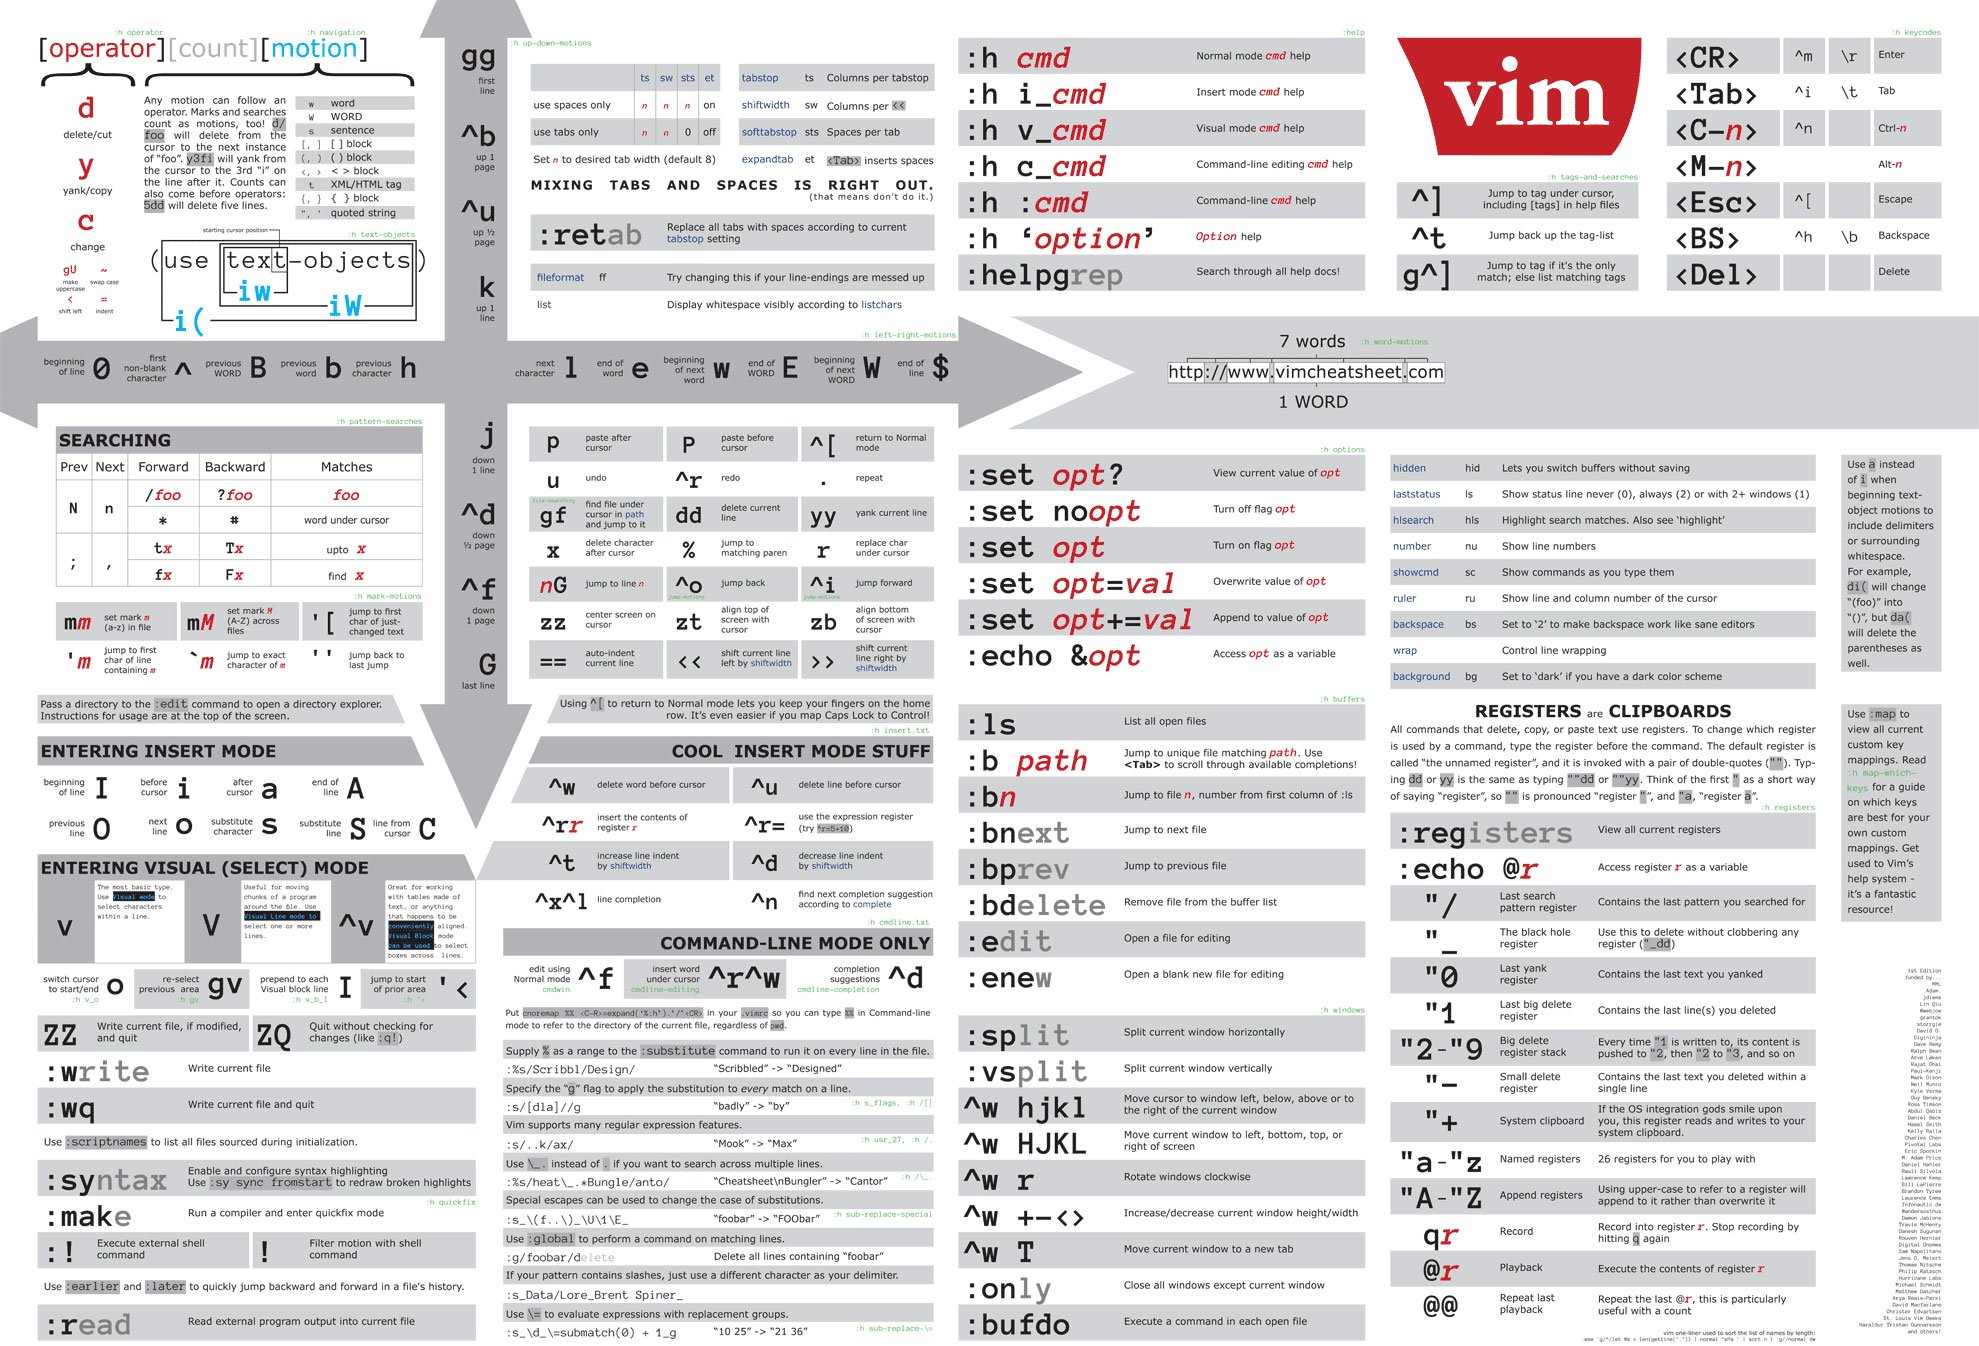

Tip: Print a cheatsheet and keep it near you for reference until you’re comfortable with vim’s commands.
Opening Two Files at Once Stacked (above/below): term1 Copy code vim -o /tmp/firstvimfile.txt secondvimfile.txt Switch between files using: java Copy code Ctrl+w k (switch to the file above) Ctrl+w j (switch to the file below) Side by side: term1 Copy code vim -O /tmp/firstvimfile.txt secondvimfile.txt Switch between files using: java Copy code Ctrl+w l (switch right) Ctrl+w h (switch left) Find and Replace a Word Let’s create an example file:
term1 Copy code cat » /tmp/replaceexample.txt «EOL The moon doesn’t shine on your face, the sun doesn’t light your window, don’t blame either the sun or the moon! Open the curtain before your eyes! kimimben EOL Open it in vim:
term1 Copy code vim /tmp/replaceexample.txt Inside the file, suppose there’s a word kimimben that you want to replace with Mevlana. In command mode, run:
term1 Copy code :%s/kimimben/Mevlana/g Then save and exit (:wq!).
Alternatively, you can open the file at a specific line:
term1 Copy code vim /tmp/replaceexample.txt +2 Basic vim Settings When editing configuration files or code with vim, you might want to enable line numbers and automatic indentation, or adjust how tabs are handled. You can manually set these each time, but a simpler method is to put them in ~/.vimrc:
vim Copy code set number set autoindent set shiftwidth=4 set softtabstop=4 set expandtab From inside vim, you can temporarily change such settings by typing : in command mode (e.g., :set mouse=”” to disable mouse usage).
vimtutor — Interactive vim Training vimtutor is an excellent interactive tutorial that walks you through the basics of vim. If you’re new to vim, going through vimtutor once helps you understand the essential concepts. Afterward, a cheatsheet will be far more useful.
Note: Vim is an expansive topic, and we’ve only covered the basics. Practice is crucial. For starting out, vimtutor and a cheatsheet are more than enough to get you up to speed.
- Basic Network Management When talking about TCP/IP ports, one important distinction is between privileged ports (ports < 1024) and unprivileged ports (ports ≥ 1024). Only the root user can bind services to ports below 1024. Historically, this was intended as a security measure; it was assumed that only a trusted administrator could run services on these privileged ports. However, in modern times, this assumption alone is rarely enough for security.
What are Clients and Servers? A client is a program that initiates a network connection for data exchange. A server listens for and responds to client requests.
For example, browsers like Firefox or Opera act as web (HTTP) clients, sending requests for web pages to a server. Once the server receives a request, it sends the requested content back. Clients can also send data, e.g., when you fill out a form and click “Submit,” the browser sends the form data to the server.
Client and server refer to roles in a network exchange. A single computer can run multiple services—both clients and servers—simultaneously.
On Linux, there is usually no need to do anything special to configure port numbers. However, if you run custom services, you might need to adjust configurations. Occasionally, you might have to edit /etc/services to map custom port numbers to certain names, but that should be done only in special circumstances. For instance, the most common ports (22 for SSH, 80 for HTTP, 443 for HTTPS) tend to become second nature over time.
term1 Copy code less /etc/services Press q to quit.
Linux easily handles multiple network interfaces. You might have both wired and wireless on a laptop, or multiple interfaces on a server. Linux can act as a router for internal networks if configured to do so.
Below, we focus on typical configuration files and commands you might encounter on various distributions (CentOS/Red Hat/Fedora vs. Debian/Ubuntu). The fundamental steps remain similar, though file locations and naming conventions can differ.
DNS Commands — Name Resolution Utilities DNS (Domain Name System) is a distributed database that maps IP addresses to hostnames (and vice versa). Every domain has at least two DNS servers. DNS lookups often happen behind the scenes, with your local system sending a query to a DNS server that either resolves or forwards the query. All you usually need to do is direct your computer to use the correct DNS server(s).
Install DNS Utilities (Debian-based) term1 Copy code apt update && apt install -y dnsutils In Linux, the order in which hostname resolution methods are tried is defined in /etc/nsswitch.conf:
term1 Copy code cat /etc/nsswitch.conf | grep hosts You might see:
makefile Copy code hosts: files dns This means the system first checks /etc/hosts, then queries DNS servers listed in /etc/resolv.conf.
Important: Tools like nslookup and dig ignore /etc/nsswitch.conf; they always query the DNS servers in /etc/resolv.conf.
The /etc/hosts File The /etc/hosts file is a simple mapping of IP addresses to hostnames (and aliases). For example:
none Copy code 127.0.0.1 localhost localhost.localdomain localhost4 localhost4.localdomain4 ::1 localhost localhost.localdomain localhost6 localhost6.localdomain6
192.168.0.2 www.whatsthishost.com whatsthishost wth.com wth 192.168.0.3 web1.localhost web1 127.0.0.1 is the loopback address (localhost). You can add as many aliases as needed, but it’s best to keep them consistent and descriptive (e.g., db3.dmz1.mycompany.com).
The /etc/resolv.conf File This file tells your system which DNS servers to query. For example:
none Copy code search acikkaynakfikirler.com nameserver 10.0.20.1 nameserver 8.8.8.8 search sets your default domain suffix, so a command like ping web2 tries web2.acikkaynakfikirler.com first. nameserver lines specify DNS server IP addresses. nslookup — Name Server Lookup nslookup queries DNS servers in either an interactive or non-interactive mode:
Interactive: term1 Copy code nslookup www.google.com exit Non-interactive: term1 Copy code nslookup -query=mx www.yahoo.com hostnamectl — Hostname Control hostnamectl allows you to view and modify the system’s hostname without manually editing /etc/hostname:
term1 Copy code hostnamectl set-hostname web1.acikkaynakfikirler.com dig — Domain Information Groper dig (Domain Information Groper) is a powerful DNS query tool from the BIND package. It queries DNS servers and shows the returned results:
term1 Copy code dig acikkaynakfikirler.com host — Simple DNS Lookup The host command is a simple DNS lookup utility:
term1 Copy code host acikkaynakfikirler.com host 127.0.0.1 whois — Domain Ownership whois displays domain ownership details, such as registration and contact info:
term1 Copy code whois acikkaynakfikirler.com Network Configuration on CentOS On CentOS/Red Hat/Fedora, each network interface has its own configuration file in /etc/sysconfig/network-scripts. For instance, ifcfg-eth0 is for the first Ethernet interface. Below is an example static IP configuration:
none Copy code NAME=ens18 DEVICE=ens18 TYPE=Ethernet PROXY_METHOD=none BROWSER_ONLY=no BOOTPROTO=none DEFROUTE=yes IPV4_FAILURE_FATAL=no IPV6INIT=yes IPV6_AUTOCONF=yes IPV6_DEFROUTE=yes IPV6_FAILURE_FATAL=no IPV6_ADDR_GEN_MODE=stable-privacy ONBOOT=yes IPADDR=10.34.45.65 NETMASK=255.255.255.0 GATEWAY=10.34.45.1 DNS1=10.34.45.254 USERCTL=no ZONE=public Here, BOOTPROTO=none indicates a static IP address. IPADDR, NETMASK, GATEWAY, DNS1 are set, and ONBOOT=yes brings the interface up at boot.
A second example using DHCP might look like this:
none Copy code TYPE=Ethernet BOOTPROTO=dhcp DEFROUTE=yes IPV4_FAILURE_FATAL=no IPV6INIT=no IPV6_AUTOCONF=no IPV6_DEFROUTE=no IPV6_FAILURE_FATAL=no NAME=eno1 UUID=a67804ff-177a-4efb-959d-5feed15cf296 ONBOOT=yes IPV6_PEERDNS=no IPV6_PEERROUTES=no With DHCP, configuration details (IP, DNS, etc.) are provided by a DHCP server. You can add DNS1, DNS2, and PEERDNS=no to override or handle DNS more manually.
Common config parameters include:
DEVICE, HWADDR, ONBOOT, IPADDR, NETMASK, GATEWAY, DNS1, DNS2, etc. BOOTPROTO can be none (static), dhcp, or bootp. USERCTL controls whether non-privileged users can start/stop the interface. After modifying these files, you can restart networking with:
none Copy code systemctl restart network (or networking on some distributions)
Note: For advanced networking (bonding, bridging, VLANs, etc.), additional parameters are placed in these or related files.
Debian/Ubuntu Network Configuration Debian/Ubuntu uses different file locations (e.g., /etc/network/interfaces or netplan with YAML files like /etc/netplan/*.yaml). Though the concept is the same, the syntax and structure differ. Always consult your distribution’s documentation for specifics.
- Networking Commands ping — Send ICMP Echo Requests To install:
term1 Copy code apt-get update && apt-get install iputils-ping -y Usage:
term1 Copy code ping www.google.com or
term1 Copy code ping 172.217.19.68 Press Ctrl + C to stop.
ifconfig An older utility (now deprecated) for configuring and displaying network interfaces. Installable via net-tools:
term1 Copy code apt-get update && apt-get install net-tools -y ifconfig -a Assign an IP: term1 Copy code sudo ifconfig eth0 192.168.56.5 netmask 255.255.255.0 Enable or disable the interface: term1 Copy code sudo ifconfig eth0 up sudo ifconfig eth0 down ip A more modern and powerful command for network configuration, replacing ifconfig/route and others:
term1 Copy code ip addr show sudo ip addr add 192.168.0.101 dev eth0@if1907 sudo ip addr del 192.168.0.101/24 dev eth0@if1907 ip neigh ip r ip route add default via 10.0.0.1 ip route add 192.168.0.0/24 via 10.0.0.1 dev eth0 arp Displays and manages the ARP cache (which maps IPs to MAC addresses):
css Copy code arp -a arp -v traceroute Tracks the route packets follow from your machine to a destination:
Copy code traceroute www.google.com mtr Combines ping and traceroute into a real-time network diagnostic:
Copy code mtr google.com route Shows or modifies the IP routing table:
Display: term1 Copy code route Add a default gateway: term1 Copy code route add default gw 10.40.23.1 Add a route for a subnet: term1 Copy code route add -net 192.168.0.0/24 gw 10.0.0.1 netstat Displays a variety of network statistics:
Shows all listening TCP ports and the programs using them: term1 Copy code netstat -tulpen Shows routing information: term1 Copy code netstat -r nmap A powerful tool for network discovery and security auditing:
General scan: term1 Copy code nmap -A www.google.com Ping scan to find hosts: term1 Copy code nmap -sP 10.40.24.0/24 Port scanning: term1 Copy code nmap -sV www.google.com -p 1-1023 nmap -O www.google.com nc — Netcat The “Swiss army knife” of network tools:
Quick port checks: term1 Copy code nc -zv www.google.com 22 80 443 8080 8443 Range scanning: term1 Copy code nc -zv www.google.com 100-500 Connect from port 5000 with 20s timeout: term1 Copy code nc -p 5000 -w 20 www.google.com 2000 Security Note: netcat can be dangerous if misused. Limit its installation on production servers unless absolutely necessary.
tcpdump Captures packets on a specified interface:
term1 Copy code tcpdump -i eth0 wireshark A powerful network protocol analyzer with a GUI. Useful for in-depth packet inspection and troubleshooting.
bmon A CLI tool that visually displays bandwidth usage and stats.
iftop Shows real-time bandwidth usage for each socket connection:
term1 Copy code iftop -i eth0 iptables The classic firewall framework on Linux, used to filter or NAT packets. Key files and commands:
/etc/sysconfig/iptables (rules for CentOS/RHEL).
/etc/iptables/rules.v4 (Debian/Ubuntu).
iptables -L -n -v (list current rules).
Tables include FILTER (default), NAT, MANGLE, etc.
Built-in chains: INPUT, OUTPUT, FORWARD.
Common commands:
none Copy code iptables -A INPUT -p tcp -s [ip] -j DROP # Add a DROP rule iptables -D INPUT -p tcp -s [ip] -j DROP # Delete a DROP rule iptables -A OUTPUT -p tcp –dport [port] -j DROP # Block outgoing traffic on port iptables -A INPUT -p tcp –dport [port] -j ACCEPT # Open a port Port forwarding (NAT):
none Copy code iptables -t nat -A PREROUTING -p tcp –dport 33389 -j DNAT –to-destination 10.40.20.144:3389 iptables -A FORWARD -p tcp -d 10.40.20.144 –dport 3389 -j ACCEPT Save rules so they persist after a reboot:
none Copy code iptables-save > /etc/sysconfig/iptables (Paths differ by distro.)
Flush all rules:
none Copy code iptables -F iptables -X iptables -Z … firewalld Used in RHEL/CentOS 7/8 as a dynamic firewall manager:
none Copy code systemctl status firewalld firewall-cmd –state firewall-cmd –get-active-zones firewall-cmd –get-services firewall-cmd –permanent –zone=public –add-port=8080/tcp firewall-cmd –reload ufw (Ubuntu’s Uncomplicated Firewall) A simpler interface to iptables:
Show status: term1 Copy code ufw status Enable/disable: term1 Copy code ufw enable ufw disable Allow SSH: term1 Copy code ufw allow ssh Reset everything: term1 Copy code ufw reset
- telnet, ssh, whoami, w, uname telnet A legacy protocol for remote login (TCP port 23). Not secure—traffic is sent in plain text. Sometimes used for debugging or checking if a port is open.
term1 Copy code telnet [hostname or IP] telnet [hostname or IP] [port] ssh SSH is the recommended way to securely connect to a remote machine. It encrypts traffic, preventing eavesdropping or man-in-the-middle attacks. Typically uses port 22. On Linux:
term1 Copy code ssh username@server-ip-or-hostname apt-get update && apt-get install openssh-server -y Using SSH Keys Instead of passwords, you can use key-based authentication:
Generate a key pair (on Linux/Mac): term1 Copy code ssh-keygen This creates ~/.ssh/id_rsa (private key) and ~/.ssh/id_rsa.pub (public key). Copy the public key to the remote server’s ~/.ssh/authorized_keys: term1 Copy code ssh-copy-id user@remote_host or manually append the key. Important: Keep your private key secret. The public key can be shared freely.
SSH Tunneling You can forward local ports to remote services behind firewalls or on localhost:
Forward local port 13306 to remote port 3306 on localhost: term1 Copy code ssh -L 13306:localhost:3306 user1@abc.home.server Forward local port 23389 to remote RDP (3389): term1 Copy code ssh -L 23389:10.44.212.16:3389 user1@abc.home.server Then, from your local machine: bash Copy code mstsc /v:localhost:23389 whoami Displays the current user ID:
term1 Copy code whoami w Shows which users are logged on and what processes they’re running:
term1 Copy code w uname — OS Information uname gives information about the system:
uname -a: Show everything. uname -s: Display the kernel name. uname -r: Display the kernel release. uname -v: Display the kernel version. Linux101-Home
Quick Review Quiz Select the correct options and then click Submit. You will see which answers are correct and incorrect.
{:.quiz} You’ve just installed a new Linux system and want to create user accounts. Make a new user for yourself with home directory /srv/data01 and UID 1200:
( ) useradd –home /srv/data01 -uid 1200 ISMIM (x) useradd -m -d /srv/data01 -u 1200 ISMIM ( ) useradd -d /srv/data01 -u 1200 ISMIM ( ) useradd -h /srv/data01 -uid 1200 ISMIM {:.quiz} Restrict user senol from accessing the system:
( ) usermod –disable senol ( ) userdel senol ( ) userdel –remove senol (x) usermod –lock senol {:.quiz} Open /tmp/deneme1.txt in vim and replace all occurrences of benisil with beniekle:
(x) vim /tmp/deneme1.txt -c %s/benisil/beniekle/g -c wq ( ) vim /tmp/deneme1.txt then :/benisil/beniekle/g ( ) vim /tmp/deneme1.txt |grep benisil|paste beniekle ( ) cat /tmp/deneme1.txt|grep benisil|cat beniekle {:.quiz} If you modify /etc/nsswitch.conf so that hosts: files dns becomes hosts: dns files, what happens?
( ) The order in /etc/resolv.conf is changed. ( ) Existing DNS records in files are deleted. (x) DNS lookups first use DNS servers in /etc/resolv.conf, then check /etc/hosts. ( ) IP –> domain resolution is swapped with domain –> IP resolution. With these core tools and configurations in mind, you’ll be well on your way to managing users, groups, and network settings on any Linux system. System administration is a broad field, and each distribution has its nuances, but a solid understanding of these basics will make further exploration much easier.

