3. Accessing/Configuring Hardware and Disk Configuration
Within this lab, we will discuss accessing computer hardware, getting status information, partitioning, file systems, and how file systems are defined during installation.
Linux101 - Home Page
The following topics will be covered in this section:
Usage Tips:
Throughout this training, command-line examples are presented in three distinct ways:
-
Text that looks like
this_hereis used to represent example commands you need to type. It’s a quick way to define relevant commands. - If you click on code blocks like the one below, the commands will run directly in the terminal (in our lab environment) without requiring you to copy and paste:
```.term1
uname -a
Code snippets shown in a “window” require you to type those commands from your keyboard. Often, you need to enter a unique ID or some other variable. That unique data can be found within the environment you’re using for this training. Items inside <> indicate where you need to replace the placeholder with real data:
arduino
Copy code
hostnamectl set
- Hardware and System Startup All operating systems run on hardware, and the underlying hardware affects how those operating systems work. Hardware can be fast or slow, reliable or unreliable. In more detail, operating systems provide various tools to configure and access hardware—for example, partitioning hard drives or reading data from external (USB) devices. To be effective, you should understand at least the basics of how Linux interacts with its hardware environment.
Configuring Hardware All computers come with a set of essential hardware—typically a central processing unit (CPU) that performs most of the work, random access memory (RAM) that stores data, and additional features that tie everything together. Much of this hardware can be configured inside Linux or directly through firmware interfaces that run before the operating system boots. These firmware interfaces might be classic BIOS screens or specialized vendor firmware interfaces.
Understanding Firmware Most hardware devices include some kind of firmware, so a computer can have multiple firmware components: one for the motherboard, possibly another for plug-in disk controllers, modems, etc. The most critical firmware typically resides in the motherboard and initializes the hardware during boot. Historically, x86 and x86-64 systems used the Basic Input/Output System (BIOS), but beginning around 2011, many new computers adopted the newer Extensible Firmware Interface (EFI) or Unified EFI (UEFI). Some older systems also use EFI. Manufacturers commonly call it “BIOS” in their documentation, even if it’s really EFI/UEFI.
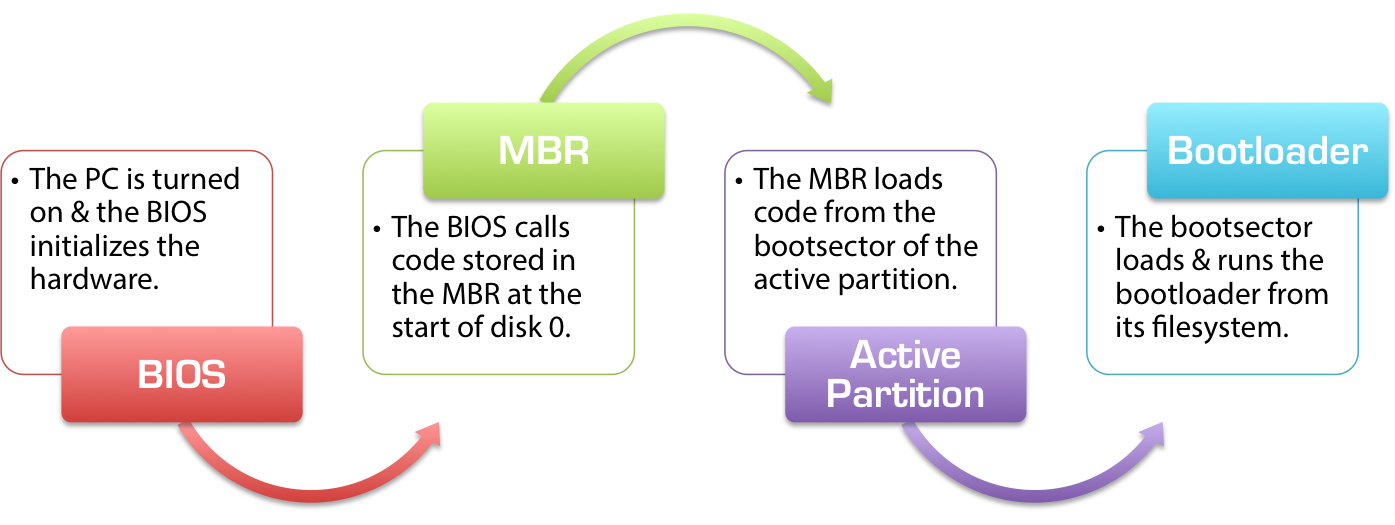
The Hardware Boot Process (A Common Interview Question) BIOS is where hardware and software first meet and where the entire boot process begins. The BIOS code usually resides on your PC’s motherboard, stored in an EEPROM or a similar chip that is specific to your hardware. BIOS is the lowest-level software that interfaces with the hardware as a whole, enabling the bootloader and kernel to communicate with and control hardware. The operating system can issue standard BIOS calls (IRQs) that let the BIOS read and write the disk and interface with other hardware components.
When you first power on your computer, a lot of things happen. The power supply and motherboard electronics distribute current to your system’s components.
POST Process When your machine starts, BIOS begins a process called POST (Power-On Self-Test). POST ensures that the CPU, memory, graphics card, and other devices are properly detected and initialized. The BIOS also maps I/O buses and identifies any disks you have attached. Modern BIOSes can even detect USB devices (keyboards, mice, external drives).
If the BIOS detects any hardware issues, it may throw an error like “Keyboard error” or “No keyboard detected” or mention incompatible memory. After all devices have been initialized, any option ROMs (plug-in device firmware for your graphics card, RAID controllers, etc.) are executed to provide features like RAID setup or advanced video settings. Then it hands control back to the BIOS.
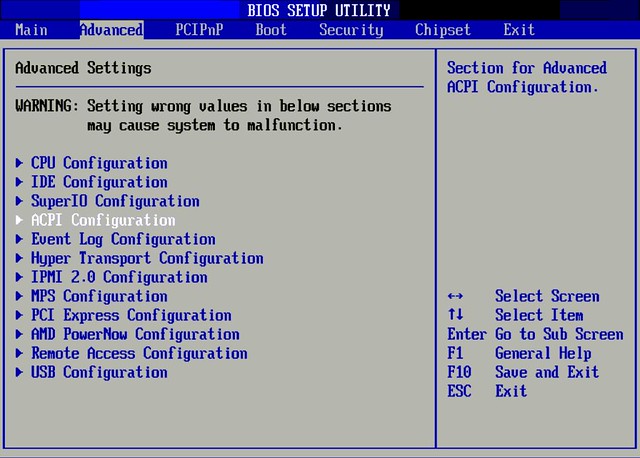
BIOS Boot Transition After configuring input/output devices, the BIOS typically presents you with a brief prompt to enter its setup interface. If you don’t select that, BIOS continues to the final stage: actually booting your OS. It loads and executes your bootloader from a specific location on disk (often the Master Boot Record, or an EFI partition) to start your operating system.
IRQ Interrupts An Interrupt Request (IRQ) is a signal that instructs the CPU to pause its current task and handle some external event, such as a keystroke. On x86 platforms, IRQs are numbered from 0 to 15, though modern x86-64 computers can have more. Some IRQs are reserved for specific hardware (like the system timer and keyboard), while others are general-purpose. For example:
sql Copy code IRQ 0 - System timer (non-configurable) IRQ 1 - Keyboard controller (non-configurable) IRQ 2 - Cascaded signals from IRQs 8–15 IRQ 3 - COM2 serial port (or shared with COM4) IRQ 4 - COM1 serial port (or shared with COM3) IRQ 5 - Parallel port or sound card IRQ 6 - Floppy disk controller IRQ 7 - Parallel port 1 (printers) IRQ 8 - Real-time clock (RTC) IRQ 9 - ACPI system control interrupt (on Intel chipsets) IRQ 10 - Open for peripherals (SCSI or NIC) IRQ 11 - Open for peripherals (SCSI or NIC) IRQ 12 - PS/2 mouse IRQ 13 - Math co-processor or floating-point unit IRQ 14 - Primary ATA interface IRQ 15 - Secondary ATA interface Check /proc/interrupts to view IRQ usage on Linux:
.term1 Copy code cat /proc/interrupts Hardware conflicts often occur when two devices attempt to use the same IRQ address. You can alter the IRQ of one device to avoid conflicts. The Linux kernel usually provides detailed info if a conflict arises.
I/O Addresses Some memory addresses are reserved for specific hardware communication. You can list them on Linux with:
.term1 Copy code cat /proc/ioports Commands for Hardware Access Normally, modern Linux systems auto-detect most hardware at startup. Drivers (kernel modules) are automatically loaded for devices like graphics or network cards. However, you can manually load or remove modules with:
lsmod: lists loaded kernel modules. insmod: loads a single module file (requires pre-loading dependencies). modprobe: loads a module from the standard location and automatically loads dependencies. modinfo: shows details about a kernel module. rmmod: removes a loaded module. For instance, if you plug in a new Wi-Fi adapter and it isn’t detected automatically, you could do something like:
.term1 Copy code sudo lsmod | grep rtl8187 sudo modinfo /lib/modules/3.10.0-1127.19.1.el7.x86_64/…/rtl8187.ko.xz sudo modprobe rtl8187 lsmod | grep rtl8187 This series of commands checks if the module is already loaded, looks at its info, and then manually loads it.
- Listing Your Hardware Commands like dmidecode and lshw are commonly used to list system hardware in detail.
dmidecode dmidecode provides human-readable information about hardware (BIOS, CPU, RAM, etc.) by reading the DMI (Desktop Management Interface) table. Install it first:
.term1 Copy code apt-get update && apt-get install dmidecode -y Then run:
.term1 Copy code dmidecode | less To focus on specific hardware types, use -t:
.term1 Copy code dmidecode -t memory dmidecode -t processor dmidecode -t system lshw lshw is another tool to list hardware details. Install it:
.term1 Copy code apt-get update && apt-get install lshw -y Examples:
.term1 Copy code lshw -short # short summary lshw -businfo # bus-level info lshw -html # output in HTML format These commands can help you see how much RAM is installed, CPU info, motherboard details, etc. Combining hardware info (via lshw, dmidecode) with performance data (via top or htop) gives you a complete view of your system.
- Disk Usage and Partitioning Setting Up a Hard Disk Whether your system uses SATA, SCSI, or other drives, you need a disk layout on Linux. If your system already has Linux installed, you may not need to partition right away. But eventually, you might need to install Linux on new hardware, add storage, or replace drives. This section covers basic partitioning approaches on x86-based servers, common mount points, and a general partitioning scheme for Linux.
Why Partition? (Partitioning) Partitioning brings many benefits:
Multiple OS Support. Each OS typically needs its own partition(s), as they do not share the same filesystem format. This is crucial for dual-boot or rescue setups. Different Filesystem Types. You can use multiple partition types, e.g. Btrfs, XFS, Ext4, etc. Disk Space Management. Partitioning lets you reserve separate space for user home directories vs. system-critical volumes. This prevents one volume from filling the entire disk and crashing the OS. Disk Error Containment. Corruption in one partition might not affect another partition. Security. You can mount sensitive areas as read-only or restrict execution, as with a noexec /tmp partition. Backups. Some backup tools work best with smaller, well-defined partitions. Real-world Linux systems often use multiple partitions; how you split them varies widely based on your needs.
How Partitions are Defined
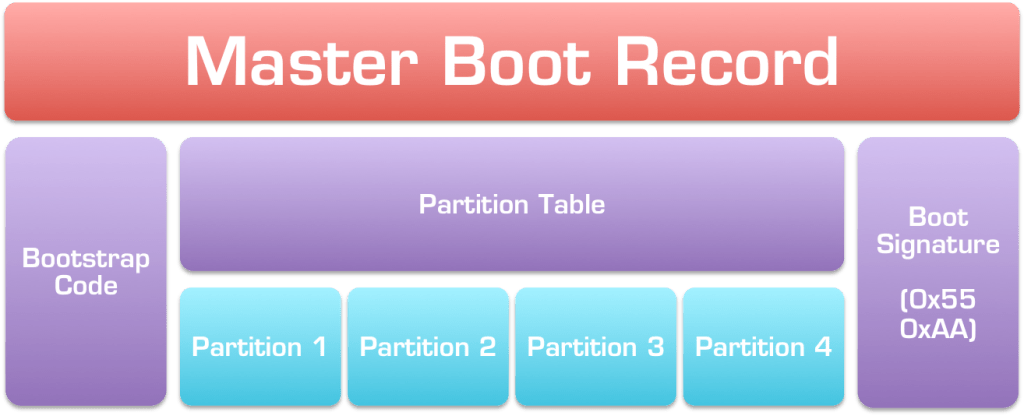
Partitions are defined by writing data structures to specific regions on disk. On x86 and x86-64 hardware, the legacy Master Boot Record (MBR) scheme was prevalent until about 2010 but is limited to 2 TiB partitions. The newer GUID Partition Table (GPT) supports very large disks and offers other advantages.
Here’s a simple comparison:
sql Copy code MBR (Master Boot Record) GPT (GUID Partition Table) Specification None UEFI Max # of primary partitions 4 Unlimited (Windows typically 128) Max partition size 2 TB 18 EB Max drive size 2 TB 18 EB Security No checksums CRC32 checksums, backup tables Partition name Stored in partition data Unique GUID ID + 36-char name Multiboot Poor Good (separate bootloader partition) (EB = exabytes, TB = terabytes, TiB = tebibytes)
You can watch more explanation on MBR/GPT via various tutorials or official Linux documentation.
Example Layouts Hypervisor KVM: bash Copy code 4GB swap 500M /boot 10GB / 5GB /home 1GB /tmp 500GB /srv/data01 Docker Host Server: bash Copy code no swap, or minimal swap 500M /boot 10GB / 5GB /home 1GB /tmp 20GB /srv/data01 Web Server (Debian-based with PHP or Java): bash Copy code 1GB swap 500M /boot 10GB / 5GB /home 1GB /tmp Partitioning Tools The classic Linux partitioning tool is fdisk. It works with MBR; for GPT you can use gdisk or parted. Basic commands:
fdisk cfdisk cgdisk gpart Using fdisk on, say, /dev/sdc:
.term1 Copy code fdisk /dev/sdc Within fdisk:
p (print) shows the current partition table. n creates a new partition. You choose primary vs. extended, start/end cylinders, etc. d deletes a partition. t changes the partition type (e.g., to Linux swap). a toggles the bootable flag. m or ? displays help. q quits without saving. w writes changes and exits. Example session creating a 20GB partition on /dev/vdc1, then printing it:
css
Copy code
fdisk /dev/vdc
n -> p -> accept defaults -> w
fdisk /dev/vdc
p
…
q
- File Systems Preparing a Partition (Formatting) Once you create a partition, you typically need to “format” it by creating a filesystem. Linux can access, read, and write data structures defined by the filesystem on that partition.
Common Filesystem Types Ext2: The classic non-journaling Linux filesystem. Used for small /boot or embedded systems. Ext3: Ext2 + journaling. More crash resistant. Ext4: An evolution of Ext3 with better performance and support for huge disks. XFS: Known for high performance, originally from SGI IRIX. Good for large files and parallel I/O. Btrfs: A next-generation filesystem inspired by ZFS, offering advanced features. In some distros, still considered somewhat experimental. JFS: IBM’s journaling filesystem from AIX/OS2. ReiserFS: An older journaling filesystem with good small-file performance, but less popular now. For external or cross-platform usage, you might see FAT, NTFS, or exFAT. For CD-ROM or DVD, ISO-9660. macOS has HFS+, but on Linux these are mostly read-write with limitations (NTFS-3G is more complete, etc.).
Creating a Filesystem
You typically use commands of the form mkfs.
bash Copy code mkfs.ext4 /dev/vdc1 mkfs -t xfs /dev/vdc1 mkfs -t btrfs /dev/vdc1 For example:
.term1 Copy code mkfs.ext4 /dev/vdc1 mount /dev/vdc1 /srv/data02 Now /dev/vdc1 is formatted with Ext4 and mounted at /srv/data02.
The dd Program dd can perform low-level copying of device data, e.g., creating a disk image or wiping a disk. Common usage:
bash Copy code dd if=/dev/zero of=/tmp/filesystem.img bs=1024 count=10240 mkfs.ext4 /tmp/filesystem.img mount /tmp/filesystem.img /srv/disk1 This creates a 10MB file filled with zeros, formats it with Ext4, and mounts it at /srv/disk1. This is commonly used for test environments or swap-file expansions.
Creating Swap Space Linux uses swap partitions to extend RAM onto disk. You can identify a swap partition by ID 0x82 (MBR). To prepare swap:
.term1 Copy code mkswap /dev/sdc2 swapon /dev/sdc2 Now your system can use that partition for swap. The file /etc/fstab can automatically mount this swap partition on boot.
Checking Filesystem Health Tools like dumpe2fs (for ext*) or xfs_info (for XFS) examine settings, while fsck checks for and attempts to fix filesystem errors. Typically:
bash Copy code fsck -t ext4 /dev/sda1 fsck -t xfs /dev/sdb1 # For XFS, usually xfs_check, xfs_repair Monitoring Disk Usage df shows free/used space per filesystem:
.term1 Copy code df -Th -T: show filesystem type -h: human-readable df -i shows inode usage.
du shows disk usage per directory:
.term1 Copy code du -hs /usr/* -s: summary -h: human-readable Mounting and Unmounting (mount, umount) Linux organizes all files under a single directory tree rooted at /. Each partition (or image file) is “mounted” somewhere in this tree:
.term1 Copy code mount -t ext4 /dev/sda2 /srv/data01 For temporary or removable media, you might mount it under /mnt or /media. To unmount:
.term1 Copy code umount /srv/data01 /etc/fstab (Filesystem Table) /etc/fstab defines filesystems to mount at boot:
php Copy code
UUID=f95103a7-93ac-47b1-bda0-feef8030c157 / xfs defaults 0 0 UUID=2207935a-e1aa-48a1-961c-ec931f97be12 /srv/data01 xfs defaults 0 0 Use blkid or lsblk to find UUIDs. For example:
.term1 Copy code lsblk blkid | grep sda1 Then place the UUID in /etc/fstab so it mounts reliably at boot. The 5th field (dump) is for old-style backups (rarely used), and the 6th field (pass) controls fsck order (0=skip, 1=check root, 2=check other partitions).
- Package Management Systems (RPM and deb) A package manager automates installing, upgrading, configuring, and removing software. Windows has “Add or Remove Programs”; macOS has the App Store. Linux distributions use packages (archives) containing software plus metadata for dependencies, version, etc.
Types of Package Managers SUSE/OpenSUSE: .rpm, manages with zypper CentOS/RedHat/Fedora: .rpm, uses yum or dnf Debian/Ubuntu: .deb, uses apt-get/aptitude/apt All package managers handle dependencies (shared libraries or other packages). Instead of compiling from source, you can usually install from repositories maintained by your distro.
Example commands Action zypper apt yum/dnf Install package zypper in pkg apt install pkg yum install pkg Remove package zypper rm pkg apt remove pkg dnf remove pkg Update package list zypper ref apt update yum check-update Upgrade system zypper up apt upgrade yum update Low-Level Tools (rpm, dpkg) dpkg -i package.deb / rpm -i package.rpm to install dpkg -l / rpm -qa to list installed packages dpkg –search file / rpm -qf file to see which package provides a file dpkg –status pkg / rpm -q pkg to get info about a package High-Level Tools (apt, yum, zypper) apt search pkg / yum search pkg / zypper search pkg to find a package apt install pkg -y / yum install pkg -y / zypper install pkg to install apt remove pkg / yum erase pkg to remove apt show pkg / yum info pkg to see details You can update your entire system with apt upgrade or yum update. Usually, you do this to keep security patches current.
- Libraries and Their Importance in Package Management Most Linux software depends heavily on shared libraries (e.g., libc, graphical libraries, etc.). If a library is missing or the wrong version, you might have dependency errors.
Library Paths /etc/ld.so.conf lists library directories. Environment variable $LD_LIBRARY_PATH can add extra directories for dynamic linking. Finding Shared Libraries ldd /path/to/binary lists all shared libraries a program depends on. ldconfig updates the cache of libraries after installing new ones.
- Managing Processes In Linux, init was historically the first process (PID=1), but modern systems use systemd. systemd is designed to start processes in parallel, improving boot times.
Process Management Commands (pgrep, ps, watch, kill, top)
pgrep / pkill pgrep pattern searches for running processes. pkill pattern sends a signal (by default SIGTERM) to those processes.
Examples:
.term1 Copy code pgrep -u root ssh Lists ssh processes owned by root.
ps - process snapshot ps lists active processes. Without arguments, it only shows processes in the current shell. Popular usage:
.term1
Copy code
ps aux # all processes, user-oriented
ps -ef # all processes, sysv style
ps aux –sort=-pcpu,+pmem
ps -ef | grep “process_name”
-u for processes by a specific user, -p
watch - repeatedly run a command
watch
.term1 Copy code watch -n 1 ‘ps -e -o pid,uname,cmd,pmem,pcpu –sort=-pmem,-pcpu | head -15’ Press Ctrl+C to exit.
kill - send signals to processes
kill
top - real-time process viewer top shows a real-time summary of your system, including CPU usage, memory usage, load average, and a list of top processes. Press q to quit. For more advanced features, consider htop.
Linux101 - Home Page Linux101 - Section4
Topic Review, Short Quiz Choose the correct options and then click Send. You’ll see which answers are correct and which are incorrect.
{:.quiz} How can you see the amount of RAM in a server and the number of populated memory slots?
( ) ls -la ( ) cat /proc/meminfo (x) lshw -c memory ( ) lshw -businfo {:.quiz} You want to back up an entire disk bit-by-bit. Which command lets you do that?
(x) dd ( ) gzip ( ) cp {:.quiz} Which command lists your disk partitions (showing start/end information)?
( ) lsblk (x) fdisk ( ) diskpart {:.quiz} Which statement is incorrect regarding an MBR disk?
( ) Maximum 4 primary partitions ( ) Disk’s first 512 bytes store the MBR (x) Supports up to 18TB disk size ( ) Allows multiboot {:.quiz} You’ve just added a new drive to your system. How do you find its name (e.g., /dev path)?
( ) dmidecode ( ) lshw ( ) ( )

